Zapier is the most versatile automation tool for businesses in 2025. By connecting your favorite apps without coding, it eliminates repetitive tasks and saves hours of manual work each week. This comprehensive guide will show you exactly how to set up powerful automations that streamline your workflows, reduce errors, and let you focus on high-value work.
Why Business Automation Matters Now
Manual tasks drain productivity. According to recent research, the average knowledge worker spends 41% of their time on repetitive tasks that could be automated. This translates to over 16 hours weekly of wasted potential.
Zapier solves this problem by connecting over 5,000 apps through an intuitive visual interface. Whether you’re a solopreneur or part of a large team, automation delivers immediate benefits:
- Save 5-20 hours weekly on manual data transfer
- Eliminate copy-paste errors
- Ensure consistent process execution
- Scale operations without proportional time investment
- Respond to events in real-time without constant monitoring
Let’s explore how to implement these automations in your business.
Getting Started with Zapier
What Exactly is Zapier?
Zapier works on a simple trigger-action model:
- When something happens in one app (trigger)
- Zapier automatically performs an action in another app
This creates what Zapier calls a “Zap” – an automated workflow connecting your tools.

For example:
- When you receive a new Typeform submission (trigger)
- Zapier creates a new contact in HubSpot (action)
This simple paradigm can be expanded to create complex workflows with multiple steps and conditional logic.
Setting Up Your Zapier Account
Before building automations, you need a properly configured account:
- Create an account at Zapier.com (start with the free plan to experiment)
- Choose your pricing tier based on needs:
- Free: 100 tasks/month, single-step Zaps
- Starter ($19.99/month): 750 tasks/month, multi-step Zaps
- Professional ($49/month): 2,000 tasks/month, advanced features
- Team ($69/month): Collaboration tools and shared workspaces
- Install the Chrome extension for creating Zaps directly from web apps
- Connect your most-used apps to your Zapier account:
- Go to “My Apps” in your account settings
- Search for and connect your essential tools
- Authorize Zapier to access each account
Pro tip: Start by connecting the 5-7 apps you use daily. Don’t overwhelm yourself by connecting dozens of apps at once.
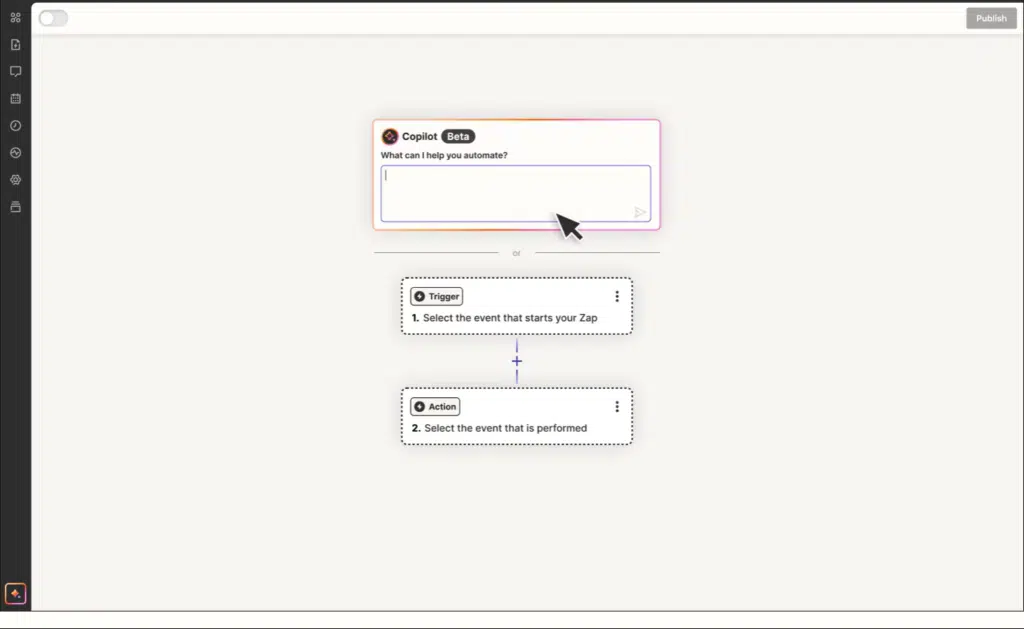
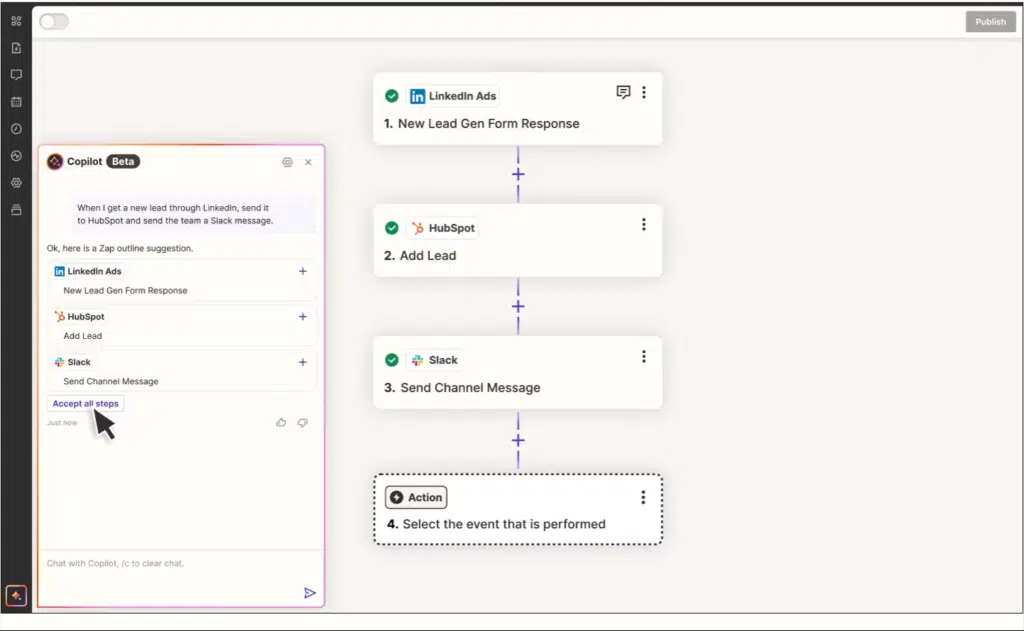
Creating Your First Zap
Let’s build a simple but useful Zap to understand the process:
Example: Send Slack notifications for new Gmail emails with specific keywords
Select Your Trigger App
- Click “Create Zap” in the Zapier dashboard
- Search for and select “Gmail” as your trigger app
- Choose “New Email” as the trigger event
- Connect your Gmail account if not already connected
- Configure the trigger:
- Specify which inbox to monitor
- Add a search string like “subject:(urgent OR important)”
- Select whether to include attachments
Test Your Trigger
- Click “Test trigger” to ensure Zapier can access your Gmail
- Zapier will find recent matching emails
- Select one of these emails to use as sample data
Add Your Action App
- Click “+” to add an action step
- Search for and select “Slack” as your action app
- Choose “Send Channel Message” as the action event
- Connect your Slack account if not already connected
- Configure the action:
- Select the channel to post in
- Design your message format using Gmail variables:
*New Important Email* From: {{from}} Subject: {{subject}} Body: {{body_plain}} - Add any additional options like notifications
Test Your Action
- Click “Test & Review” to send a test message to Slack
- Check Slack to verify the message format looks correct
- Make adjustments if needed
Name and Activate Your Zap
- Give your Zap a descriptive name like “Gmail Important Emails to Slack”
- Turn on your Zap using the toggle switch
- Monitor its activity in the Zaps dashboard
Congratulations! You’ve created your first automated workflow.
Building Advanced Workflows
Once you understand the basics, you can create more sophisticated automations.
Multi-Step Zaps
Multi-step Zaps perform multiple actions from a single trigger:
Example: Customer Onboarding Automation
- Trigger: New client signs contract in DocuSign
- Action 1: Add client to HubSpot CRM
- Action 2: Create project in Asana
- Action 3: Send welcome email via Gmail
- Action 4: Notify account team in Slack
- Action 5: Schedule kickoff meeting in Google Calendar
To add multiple actions:
- Create your trigger as normal
- After setting up your first action, click the “+” button
- Search for and select your next action app
- Configure each action using data from previous steps
- Continue adding actions until your workflow is complete
Pro tip: Keep your Zaps focused on specific processes. Rather than creating one massive Zap that handles everything, build several targeted Zaps for better maintainability.
Using Filters for Conditional Logic
Filters determine whether actions execute based on specific conditions:
Example: Lead Routing Based on Value
- Trigger: New lead form submission
- Filter: Only continue if lead value > $10,000
- Action: Assign to senior sales rep in CRM
To add a filter:
- Click the “+” button between your trigger and action (or between actions)
- Select “Filter”
- Create your condition using logical operators:
- Field contains/does not contain text
- Number greater than/less than value
- Date before/after specific time
- Multiple conditions with AND/OR logic
Advanced filter example:
(Lead Score > 80 OR Estimated Budget > 5000) AND NOT Email Contains "@competitor.com"Using Formatters to Transform Data
Formatters help manipulate data between steps:
Example: Standardizing Contact Data
- Trigger: New Typeform submission
- Formatter: Convert name to proper case (John smith → John Smith)
- Formatter: Extract domain from email (john@company.com → company.com)
- Action: Create contact in CRM with clean data
To add a formatter:
- Click the “+” button where you need data transformation
- Search for and select “Formatter by Zapier”
- Choose the formatter type:
- Text: Change case, find/replace, extract portions
- Numbers: Perform calculations
- Dates: Format or modify dates
- Lists: Manipulate arrays of items
- Utilities: Work with URLs, emails, phone numbers
Popular formatter uses:
- Converting timestamps between formats
- Extracting first/last names from full names
- Cleaning and standardizing phone numbers
- Converting currencies or units
- Creating slugs for URLs
Automating Key Business Processes
Let’s explore practical automation examples for different business functions:
Marketing Automation
Lead Capture and Nurturing
- Trigger: New lead magnet download on website
- Action 1: Add subscriber to email marketing platform
- Action 2: Tag based on specific download
- Action 3: Add to CRM with lead source data
- Action 4: Send personalized follow-up email
Social Media Content Distribution
- Trigger: New blog post published on WordPress
- Action 1: Create LinkedIn post with title and link
- Action 2: Schedule Twitter post via Buffer
- Action 3: Add to Facebook page with image
- Action 4: Log content in content calendar spreadsheet
Sales Automation
Lead Qualification and Routing
- Trigger: New contact form submission
- Filter: Check for company size and budget fields
- Action 1: Create lead in CRM
- Action 2: Score lead based on form answers
- Action 3: Assign to appropriate sales rep
- Action 4: Send personalized outreach template
Deal Progress Notifications
- Trigger: Deal stage changes in CRM
- Filter: Only deals above $5,000
- Action 1: Send Slack notification to sales team
- Action 2: Update sales forecast spreadsheet
- Action 3: Schedule appropriate follow-up tasks
Customer Service Automation
Support Ticket Triage
- Trigger: New support ticket created
- Filter: Check for priority keywords
- Action 1: Tag and prioritize in help desk
- Action 2: Alert appropriate team in Slack
- Action 3: Create internal tracking item
Customer Feedback Collection
- Trigger: Order marked as fulfilled
- Delay: Wait 5 days
- Action 1: Send feedback survey
- Action 2: Add reminder to check responses
- Action 3: Update customer record with survey sent status
Operations Automation
New Employee Onboarding
- Trigger: New hire form completed by HR
- Action 1: Create accounts in key systems
- Action 2: Add to team channels and groups
- Action 3: Schedule onboarding meetings
- Action 4: Send welcome email with resources
- Action 5: Create onboarding checklist in project tool
Expense Reporting and Approval
- Trigger: New expense submitted in form
- Filter: Route based on amount thresholds
- Action 1: Create approval task for manager
- Action 2: Add line item to expense tracking
- Action 3: Send confirmation to submitter
Advanced Zapier Features
Using Paths for Complex Logic
Paths allow your workflow to branch based on conditions:
Example: Lead Processing Based on Score
- Trigger: New lead form submission
- Path A: If score > 80, create sales opportunity and notify sales team
- Path B: If score 50-80, add to nurture campaign
- Path C: If score < 50, add to general marketing list
To create paths:
- Click the “+” button where you want branching to occur
- Select “Paths”
- Define conditions for each path
- Add actions under each path branch
Delay and Schedule Features
Control when actions happen with time-based features:
Delays pause your Zap for a specified time:
- Wait 3 days after a purchase before sending feedback request
- Pause 1 hour before following up on an email
- Hold for 24 hours before escalating unanswered support tickets
Schedules ensure actions happen at specific times:
- Only send notifications during business hours
- Schedule social media posts for optimal engagement times
- Batch process data at night when systems have less load
To add time controls:
- Click the “+” button where timing matters
- Select “Delay” or “Schedule”
- Configure your timing parameters
Using Storage for Persistent Data
Zapier Storage lets you save and retrieve data across Zap runs:
Example: Track Customer Interaction Count
- Trigger: Customer support interaction
- Action 1: Get current interaction count from storage
- Action 2: Increment count by 1
- Action 3: Store updated count
- Action 4: If count > 3, flag for account review

To use storage:
- Add a “Storage by Zapier” step
- Choose “Get Value” or “Store Value”
- Define a unique key to identify your data
Storage is particularly useful for:
- Tracking counters and running totals
- Storing last execution timestamps
- Maintaining state between Zap runs
- Creating simple databases for reference
Optimizing Your Zaps
Troubleshooting Common Issues
When your Zaps don’t work as expected:
- Check your trigger configuration
- Verify search terms and filters
- Ensure correct accounts are connected
- Test trigger manually to confirm data
- Examine data mapping
- Preview data at each step
- Check for missing or null values
- Verify format consistency (dates, numbers)
- Review app permissions
- Reconnect accounts if permissions changed
- Check for expired API tokens
- Verify access levels for connected accounts
- Monitor error logs
- Check Zap History for specific error messages
- Look for pattern of failures
- Search Zapier help for error codes
Performance Optimization
Make your Zaps more efficient:
- Reduce unnecessary steps
- Use filters early to prevent unneeded processing
- Combine related Zaps when logical
- Use paths instead of multiple separate Zaps
- Optimize data handling
- Only include necessary fields in triggers
- Use built-in functions instead of extra steps
- Batch process when appropriate
- Manage your task limits
- Monitor monthly task usage
- Schedule non-urgent Zaps for off-peak times
- Adjust polling intervals for less urgent triggers
- Prevent duplicate processing
- Use deduplication keys when available
- Implement ID checking in storage
- Add custom filtering for unique records
Integrating Zapier with Popular Business Tools
CRM Systems
Salesforce Automation Examples:
- Create contacts from form submissions with custom field mapping
- Update opportunities when deals progress in pipeline
- Sync customer data between Salesforce and marketing platforms
- Create tasks for sales reps based on website activity
HubSpot Automation Examples:
- Add form submissions to specific lists
- Create deals when specific triggers occur
- Update contact properties from external data
- Trigger workflows based on external events
Marketing Platforms
Mailchimp Integration Ideas:
- Add new customers to specific segments
- Trigger campaigns based on purchase behavior
- Sync subscriber status across platforms
- Update tags based on website interactions
Social Media Automation:
- Cross-post content between platforms with formatting
- Save engagement metrics to spreadsheets
- Monitor brand mentions and add to CRM
- Schedule content based on performance data
Project Management

Asana Workflow Examples:
- Create projects from templates when deals close
- Add tasks when support tickets need development work
- Update task status when code commits happen
- Notify teams when deadlines approach
Trello Process Ideas:
- Move cards between lists based on external triggers
- Create cards from form submissions or emails
- Add checklist items from spreadsheet data
- Send notifications when cards are moved to specific lists
Finance and Accounting
QuickBooks Automation:
- Create invoices from form submissions
- Add customers when they sign up on your website
- Track time entries from project management tools
- Sync payment statuses with CRM
Xero Integration Examples:
- Create bills from approved expenses
- Generate invoices when projects complete
- Reconcile payments with order information
- Update contact details from CRM changes
Building a Company-Wide Automation Strategy
Identifying Automation Opportunities
Find processes ripe for automation:
- Document current workflows
- Map out steps in each process
- Note which tools are used at each stage
- Identify manual data transfer points
- Look for red flags:
- Tasks described as “copying and pasting”
- Regular data exports and imports
- Recurring reminders and follow-ups
- Status update meetings and emails
- Error-prone manual processes
- Calculate time investment:
- Minutes per task × frequency = potential savings
- Focus on high-frequency, low-complexity tasks first
- Prioritize based on:
- Time saved
- Error reduction
- Customer impact
- Employee satisfaction
- Implementation ease
Managing Zaps Across Teams
For organizations with multiple Zapier users:
- Create naming conventions:
- Department-Process-Function
- Owner-TriggerApp-ActionApp
- Priority-Function-Detail
- Document all automations:
- Purpose and business impact
- Owner and stakeholders
- Trigger conditions and expected outcomes
- Known limitations
- Troubleshooting guidelines
- Implement access controls:
- Use Teams plan for shared workspaces
- Assign ownership to process owners
- Create shared credentials management
- Establish update procedures
- Set up monitoring:
- Regular runtime checks
- Error notifications
- Usage tracking
- Performance reviews
Measuring Automation ROI
Track the business impact of your automations:
- Time savings:
- Before: Document time for manual process
- After: Calculate time with automation
- Multiple by frequency and hourly cost
- Error reduction:
- Track error rates before automation
- Monitor error incidents after
- Calculate cost savings from fewer mistakes
- Capacity creation:
- Identify new high-value work enabled
- Measure increased throughput
- Calculate opportunity value
- Customer experience improvements:
- Reduced response times
- Increased consistency
- Higher satisfaction metrics
Example ROI calculation:
- Manual process: 15 minutes × 20 times/day × $30/hour = $150/day
- Setup cost: 2 hours × $50/hour = $100 one-time
- Ongoing maintenance: 30 minutes/month × $50/hour = $25/month
- Net monthly savings: $3,000 – $25 = $2,975
- First-year ROI: ($2,975 × 12 – $100) ÷ $100 = 356%
Future-Proofing Your Automation Strategy
Staying Updated with Zapier Changes
Keep your automations current:
- Follow Zapier’s update channels:
- Subscribe to the Zapier blog
- Join the Zapier community
- Enable product update notifications
- Regularly review your Zaps:
- Schedule quarterly automation audits
- Test critical Zaps after platform updates
- Update outdated configurations
- Explore new integrations:
- Check for native app connections that replace custom solutions
- Look for new triggers and actions
- Test advanced features as they launch
Expanding Your Automation Toolkit
When to go beyond Zapier:
- Consider complementary tools for:
- Complex conditional logic (Make.com, n8n)
- Heavy data processing (Parabola)
- Code-heavy automation (Pipedream)
- Internal tool building (Retool, Bubble)
- AI-powered workflows (OpenAI API with middleware)
- Integration platform comparison:
- Zapier: Best for breadth of integrations and ease of use
- Make.com: More powerful visual workflows with loops
- Integromat: Complex data transformations
- Workato: Enterprise-grade with robust governance
- Microsoft Power Automate: Deep Microsoft ecosystem integration
- Building an automation ecosystem:
- Use the right tool for each job
- Create handoffs between platforms
- Document your entire automation landscape
- Train team members across tools
FAQ:
Q: How does Zapier pricing work with task counts?
A: Zapier counts one task for each action step completed in your Zap. Multi-step Zaps use multiple tasks each time they run. You choose a plan based on your monthly task needs, and can upgrade as your usage grows.
Q: Can Zapier access my sensitive business data?
A: Zapier uses OAuth and secure API connections. It processes but doesn’t permanently store your data unless you explicitly use Storage features. Zapier maintains SOC 2 Type II compliance and offers enterprise security features.
Q: What happens if my Zap encounters an error?
A: Zapier will retry failed Zaps automatically and can send you error notifications. The platform attempts several retries with increasing time intervals before marking a Zap as failed and notifying you.
Q: Can I test Zaps before activating them?
A: Yes, Zapier has robust testing features at every step. You can test triggers to pull in sample data, test individual actions, and run entire Zaps in test mode before turning them on.
Q: How do I handle app rate limits with Zapier?
A: Some apps limit API calls, which can affect busy Zaps. Strategies include using batch actions when available, implementing delays between steps, scheduling Zaps to run less frequently, and upgrading to premium API tiers in your connected apps.
Next Step with Zapier
Zapier transforms from a simple tool to a strategic business asset when properly implemented. Start with these steps:
- Begin with a single process that causes consistent pain
- Document the before state to measure improvement
- Create your first 2-3 Zaps focused on this process
- Measure the impact and calculate time savings
- Share the results to build automation momentum
- Expand systematically across departments
- Build an automation community within your organization
Remember that successful automation isn’t about building the most complex Zaps—it’s about reliably eliminating repetitive work so your team can focus on creative, high-value activities that grow your business.